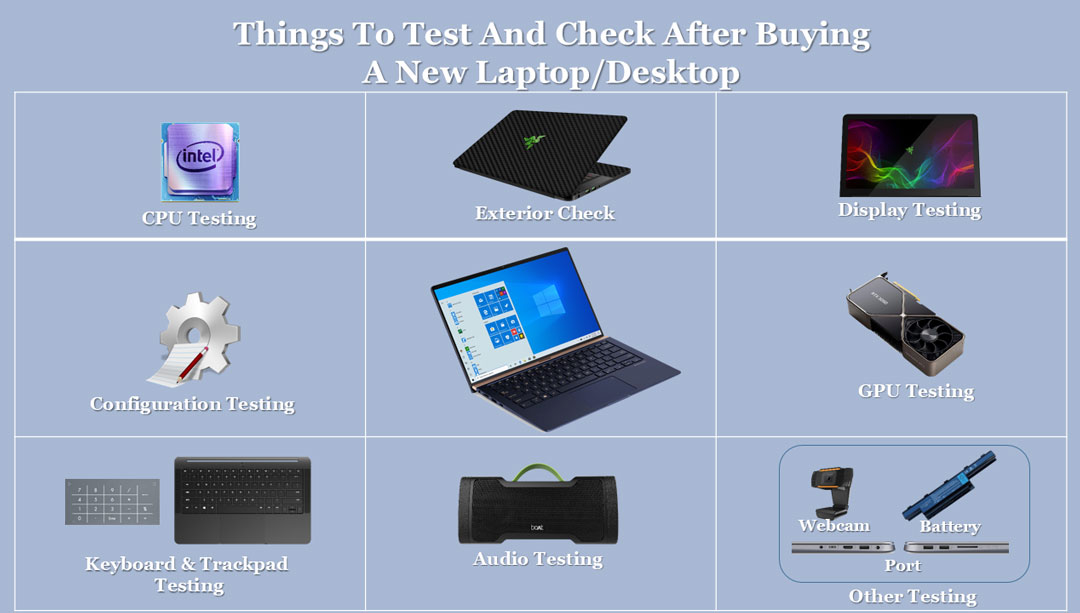
There’s no greater excitement than trying out the new Laptop or Desktop that you bought by spending a fortune. But what if in that haste, you miss out on an issue that can later cause you too much trouble?
Testing a laptop to make sure you have gotten exactly the specifications that you bargained for, is very important. Right from the hardware to its internal configuration, you need to make sure your piece is neither faulty, second-hand, nor downgraded.
There are a hundred things to check on a laptop but we won’t waste time on them all. Through this simple guide, we will focus on all the laptop essentials that you must check before putting your new equipment to full-fledged use or in simple words things to test and check after buying a new laptop.
Before we begin, let me tell you that you might find some issues in your laptop when you run these tests. And if you do, it is completely up to you to choose whether you even want to get them fixed or not.
So, test away using the following methodologies and know the ins and outs of your laptop before you start using it.
Exterior Check
Before we move on to the insides and specifications of your brand new laptop, we will first check it externally for any possible damage or any sign of it being second-hand. Here’s a full-proof methodology that you can use to be absolutely sure your laptop is brand new and in mint condition.
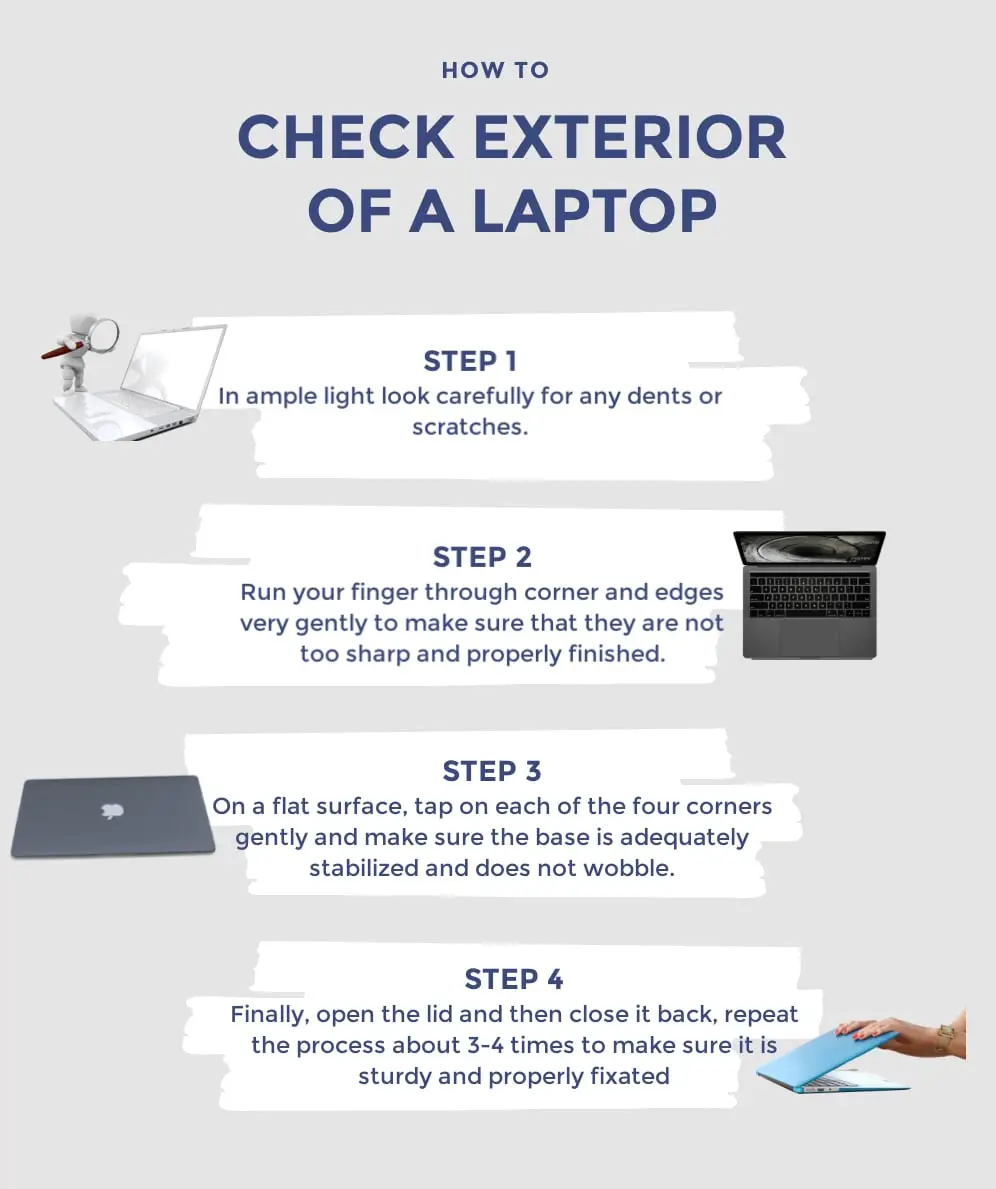
Step-by-Step Methodology to check Exterior
Step 1: Make sure there is ample light focused on your laptop and look carefully across its surface for any dents or scratches. Do this both, when the laptop is closed shut, and open.
Step 2: Next, run your finger through its corner and edges very gently to make sure that they are not too sharp and properly finished.
Step 3: Now, place the laptop on a flat surface. Tap on each of the four corners gently to make sure the base is adequately stabilized and does not wobble.
Step 4: Finally, open the lid and then close it back. And repeat the process about 3-4 times to make sure it is sturdy and properly fixated.
That’s about it! If your laptop fails even one of these exterior checks, you’ve gotten a faulty piece. The exchange at the speed of light! If it passes all of these checks, you can now shoot up that big fat investment of yours.
Configuration Testing
Before you start running checks for any potential issues or anomalies, you need to first ensure that you have got all the components that you ordered.
Configuration testing is the process in which you check the compatibility and performance of your system with each of the supported hardware and software configurations as well as their combinations.
Your laptop contains an Execution Area that enables you to create and reuse test modules for various configurations.
Before we get you started with the procedure, let us first introduce you to the three main types of configurations that you can test:
- Operating System Configuration (Win XP, Win 7 32 bit/64 bit, Win 8 32 bit/64 bit, Win 10 32 bit/64 bit)
- Database Configuration (Oracle, DB2, MySql, MSSQL Server, Sybase)
- Browser Configuration (IE 8, IE 9, FF 16.0, Chrome, Safari)
Below, we have focused on the basic configuration testing to check and verify the most primary specifications of the laptop you have just bought. Follow this easy process to ensure all your operating system pillars are in place.
Step-By-Step Configuration Testing Methodology:
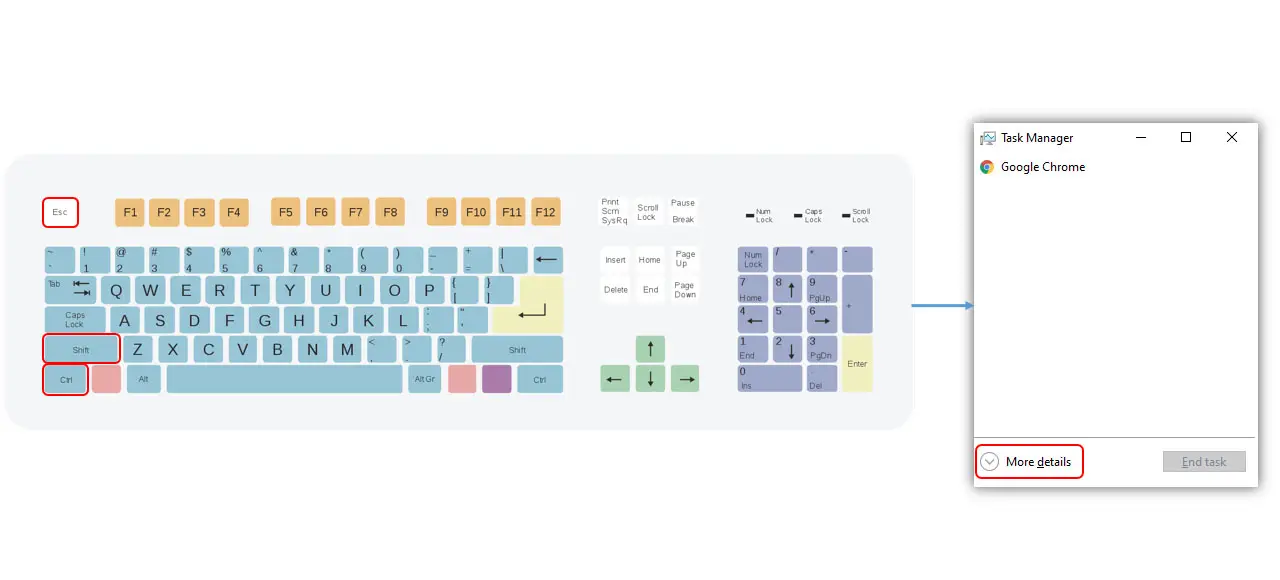
Step 1: Press the Ctrl+Shift+Esc keys together to open the task manager. Once you are in, make sure that you are in the ‘more details’ mode.
Step 2: In the Performance Tab, first verify the specifications of two things — CPU at the top right corner of the window and Memory (amount of RAM installed) at the top left corner of the screen.
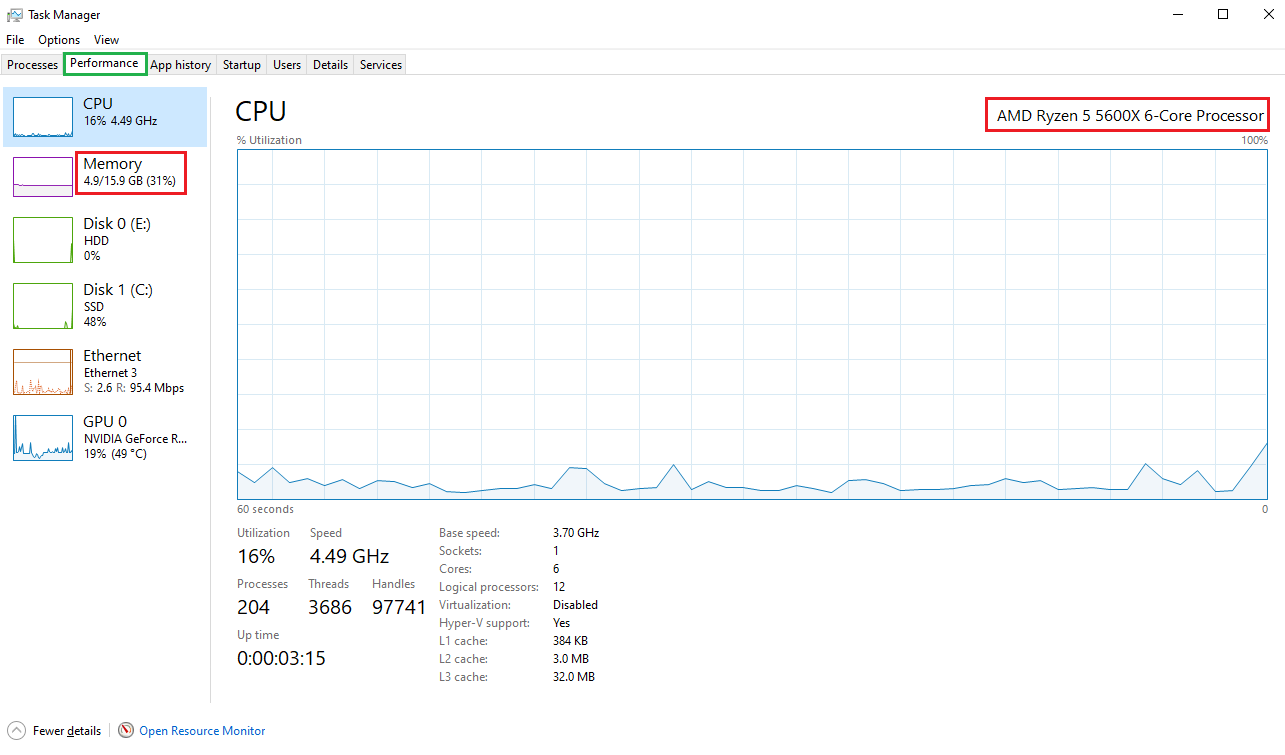
Step 3: Next, check the slots area for dual-channel depicted as ‘2 of 4’ to ensure the fastest performance. That’s all you need to check on this tab.

Step 4: Now click on the Disk tab to check if you have the right amount of storage. The storage would normally not be an exact rounded-off number like 1TB in this view.
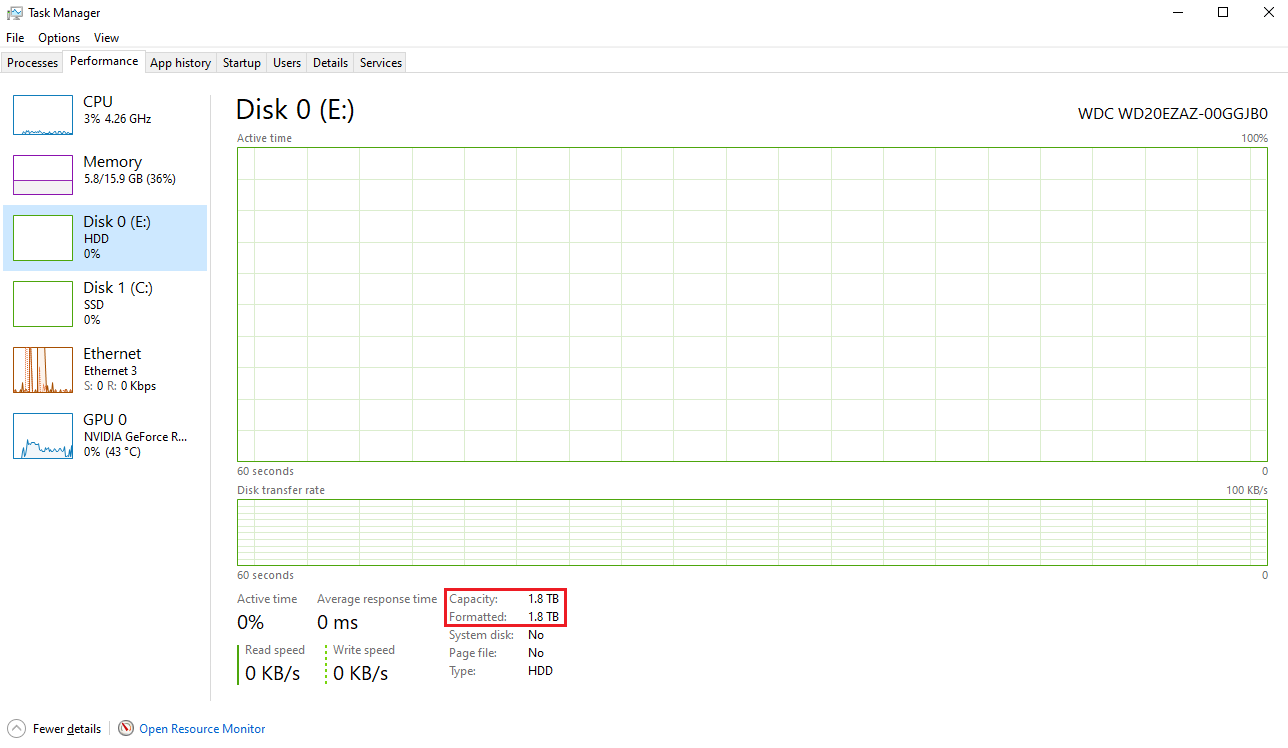
However, make sure that it is close to what you agreed to.
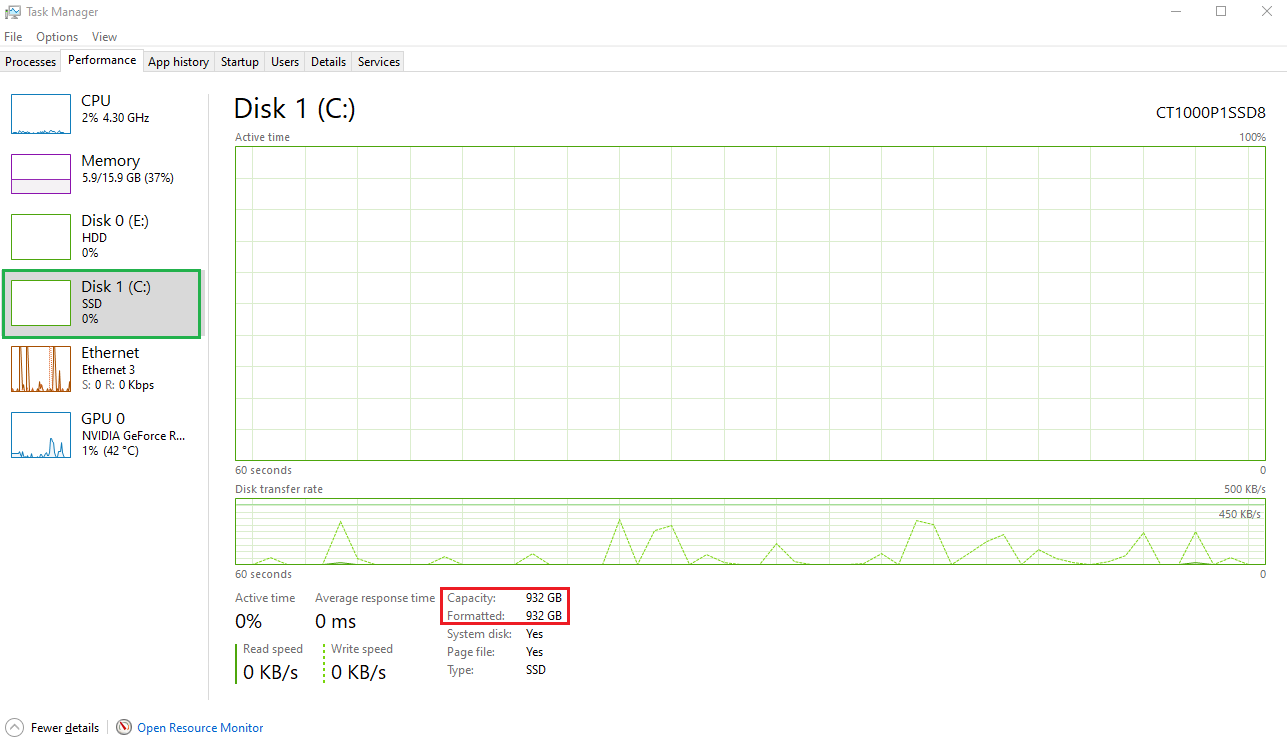
Step 5: Check the specifications of your graphics by clicking on the second GPU, generally denoted by GPU 1.

The above simple steps should have you covered with checking the basic configurations of your new laptop. There’s one additional step for those of you who have purchased the laptop for its dedicated graphics. In that case, you should see two GPUs (GPU 0 and GPU 1) listed in the tabs section.
Display Testing
The first thing that you need to check your display for is dead pixels. Dead pixels are also known as ‘defective’ pixels typically characterized by subpar performance on a liquid crystal display. These can also be identified as dark dots, bright dots, and partial sub-pixel defects.
Dead Pixels are also known as Defective Pixels.
The second important factor in your display is the backlight. When the corners or edges of your display screen leaks out light in a scene that is supposed to be completely dark when playing a movie, it is called backlight bleeding.
Ideally, in a high-quality monitor or laptop, the backlight should be evenly adjusted throughout the screen, making it consistently darker or brighter. So, if you have made the deal for a good screen, you must check its edges for the bleeding backlight.
Below, we will first help you run a quick dead pixel check followed by the backlight check. As the name suggests, this test is to check all the pixels of your laptop’s display to identify the dead ones.
Simply dim down the lights of your room, clean the screen of your laptop with a soft cloth, and follow the steps below.
Dead Pixel Testing Methodology
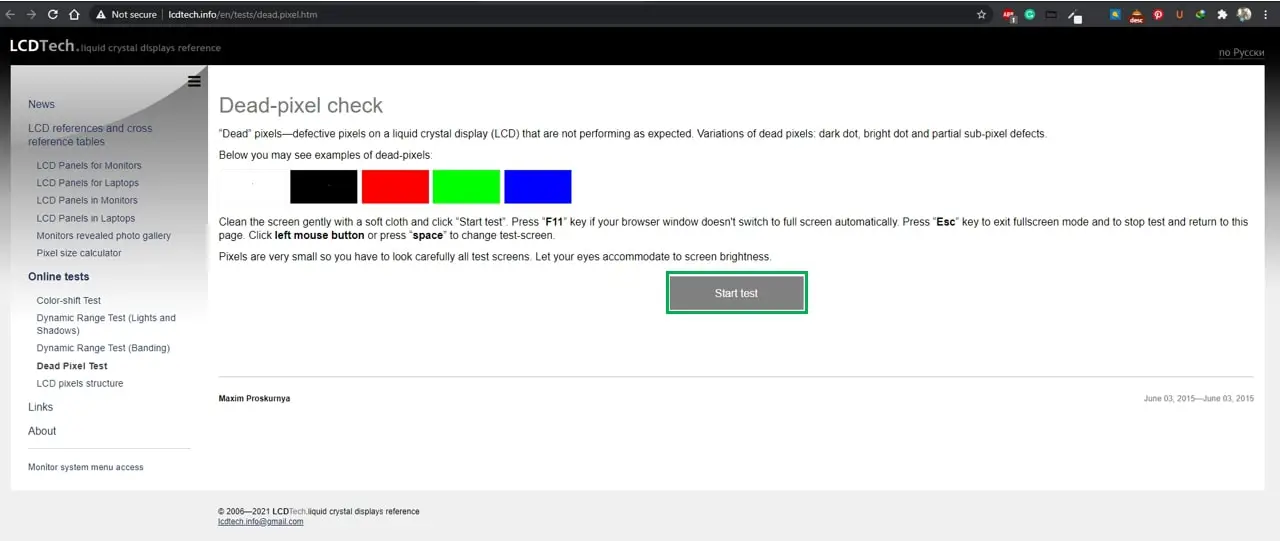
Step 1: Open a reputable Dead Pixel Test on your laptop. These are easily available online and you can find trustworthy checkers like LCD Tech to run this pixel test through.
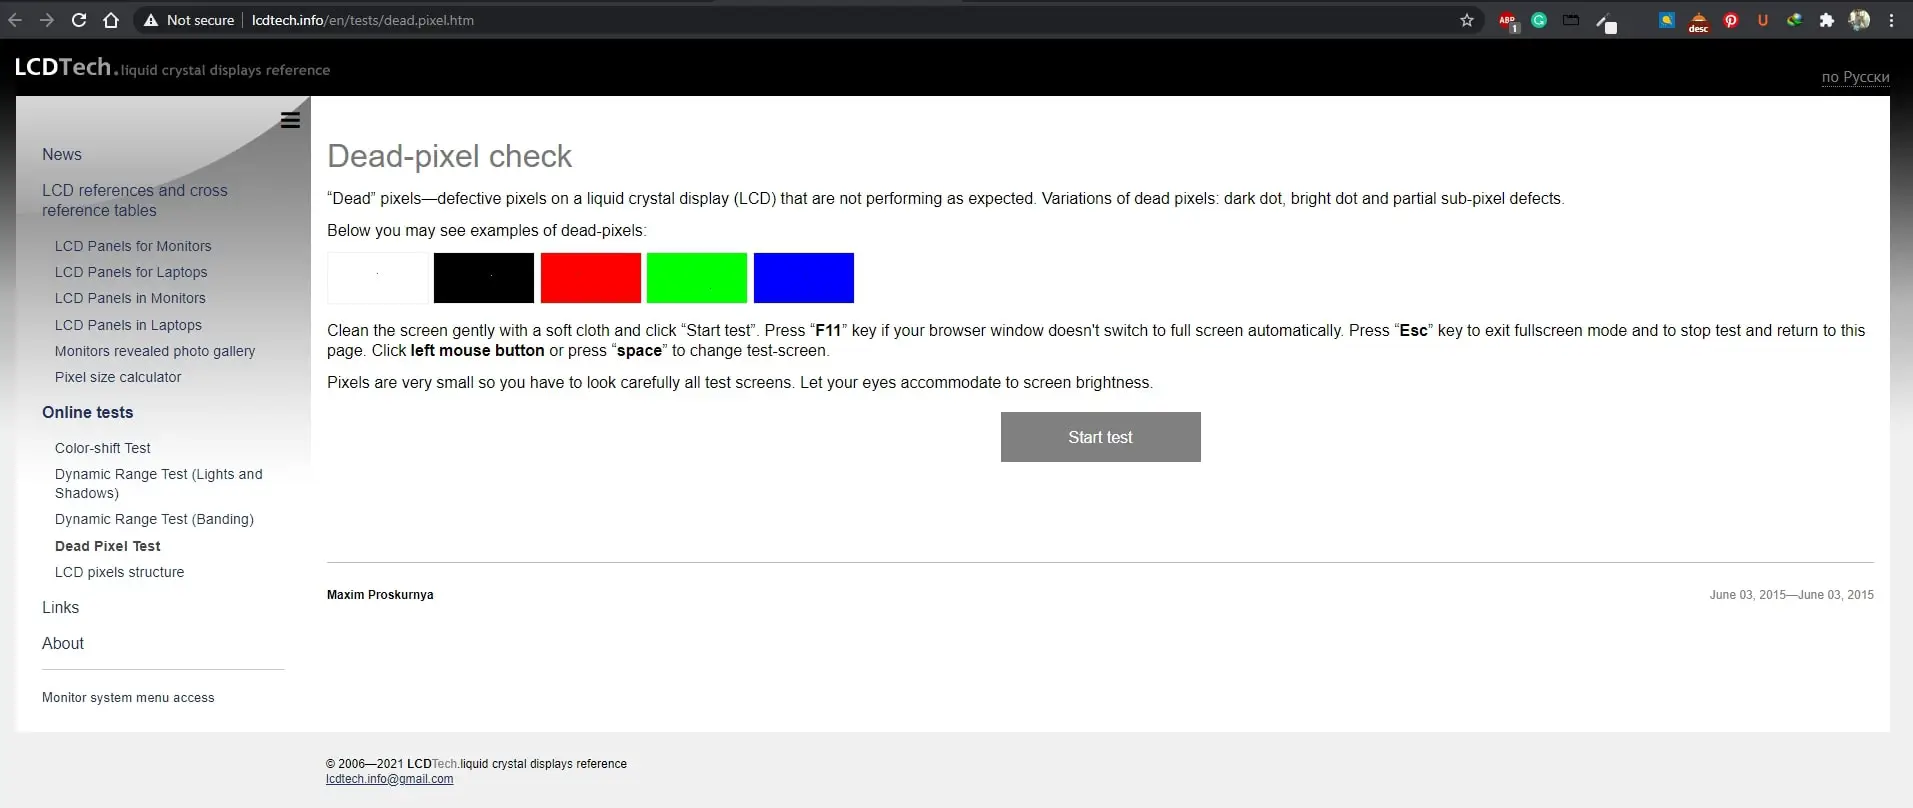
Step 2: Click on ‘start test’ and make sure your tab switches to ‘full-screen mode.’ If not, press the F11 key to enable full screen.
Step 3: Make sure that the test colors are displayed smoothly and consistently across the entire screen panel. Look out for any erroneous pixels because in an ideal case, there should be none.
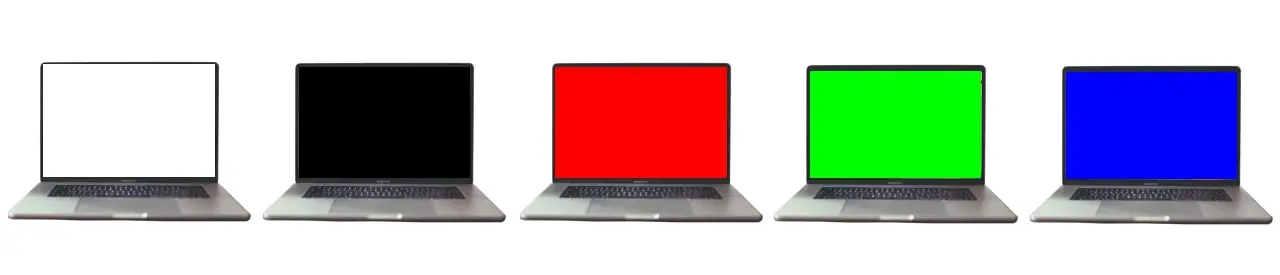
Step 4: The test colors generally go from black to white and then to the RGB set. Make sure you see the appropriate colors and not shades of these.
Once you are all set with your pixels, it’s time to check whether your expensive laptop can hold its backlight in without bleeding. For accurate results from this test, you need to ensure that you are in a completely dark room and the edges of your screen are clean. Let us quickly walk you through the simple steps to test the same.
Backlight Bleed Testing Methodology:
Step 1: Go to the same website you used for the Dead Pixel Test. Click on start test.

Step 2: Switch to the ‘black’ color and ensure the entire screen is black.
Step 3: Carefully observe if the edges or corners of your screen is brighter or lighter than the center of the screen.
Step 4: Change your brightness levels to ensure there is no bleeding at any level whatsoever.

And that’s really it! You’re done with checking your screen and display configuration for most parts. That leaves us with the final, very simple test to check the level of reflection that your screen allows.
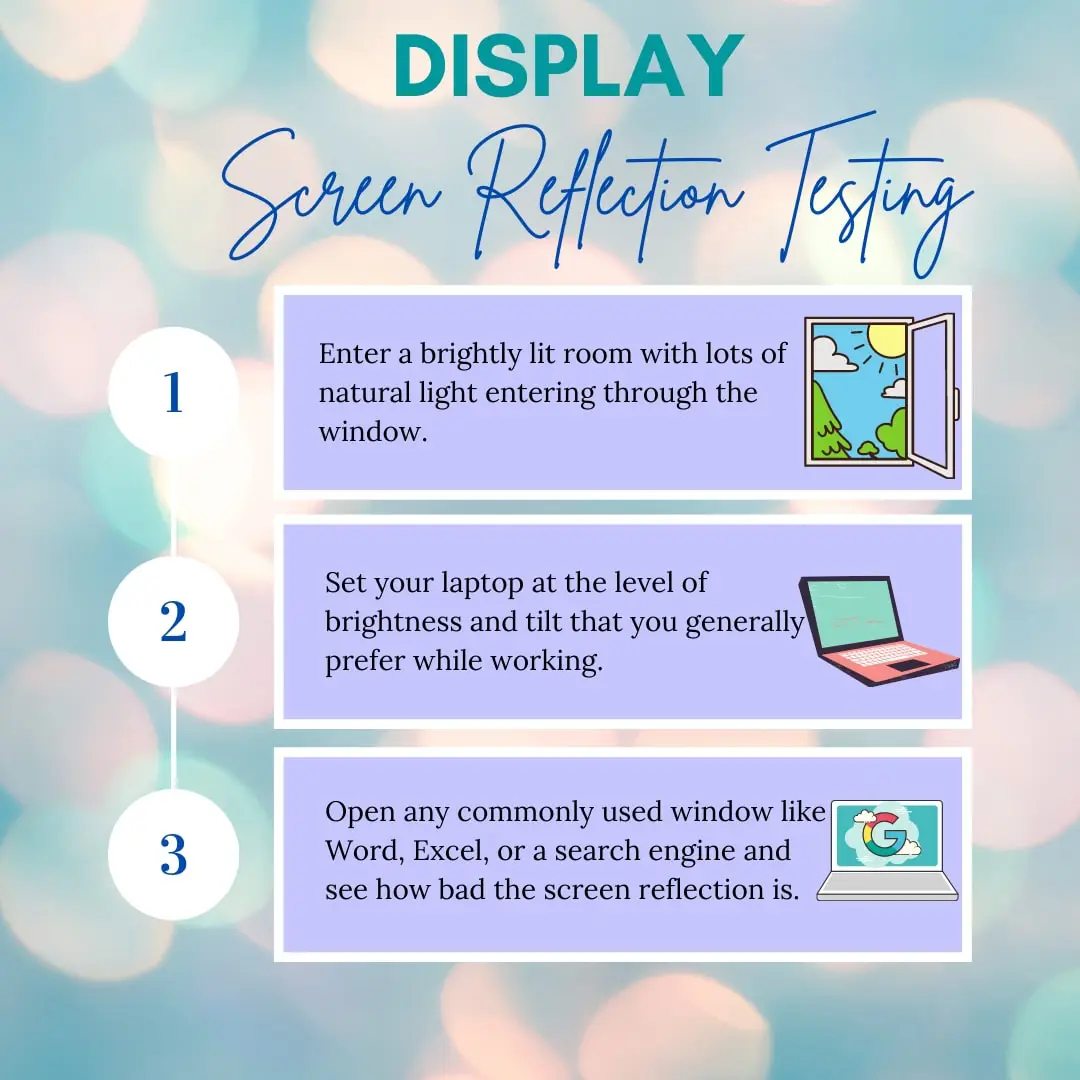
Screen reflection can get very annoying and distracting when you’re working during the day, especially outdoors or in a cubicle near the window. To save you all the hassles of brightness adjustment and display tilts, it’s best if you conduct this test beforehand. Here’s all you need to do:
Screen Reflection Testing Methodology
Step 1: Enter a brightly lit room with lots of natural light entering through the window.
Step 2: Set your laptop at the level of brightness and tilt that you generally prefer while working.
Step 3: Open any commonly used window like Word, Excel, or a search engine and see how bad the screen reflection is.
With these three tests covered, you have successfully analyzed your laptop’s display inside-out. By now you know if that steal deal was actually all of that worth it or if you will have to go through more hassles of getting these small errors fixed.
If it’s all good, let’s move on to the second most important part of a laptop — the keyboard.
Keyboard Testing
Perhaps the easiest testing you could come across, keyboard testing is an essential prerequisite to making sure that your laptop is working in a good condition. It is a common scenario to not notice certain keys malfunctioning until it’s too late to return, so it’s best if you run a thorough check through and put a rest to all your concerns.
Key Testing Methodology
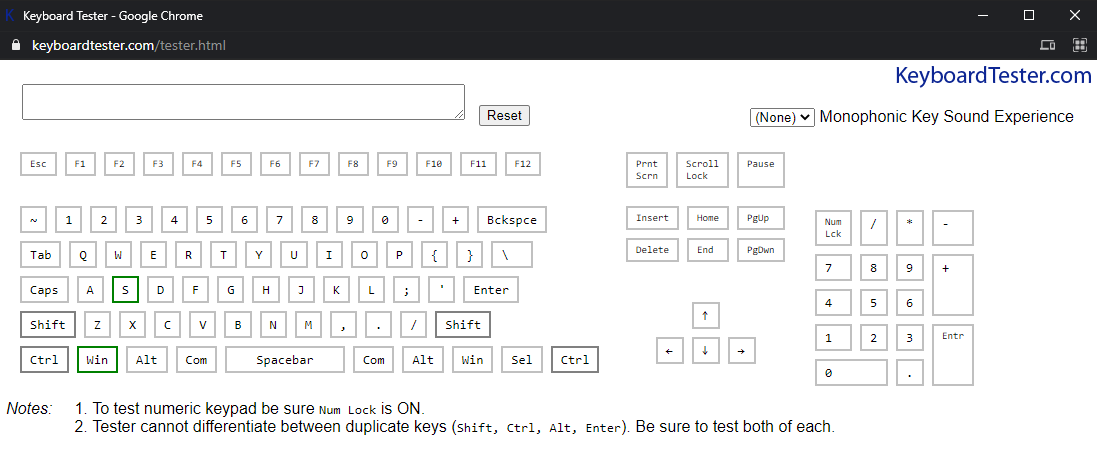
Step 1: Open a word document on your laptop or visit a keyboard tester tool. One by one, press all the alphabet and numerical keys on the keyboard. See if the right letter/number/character appears on the screen.
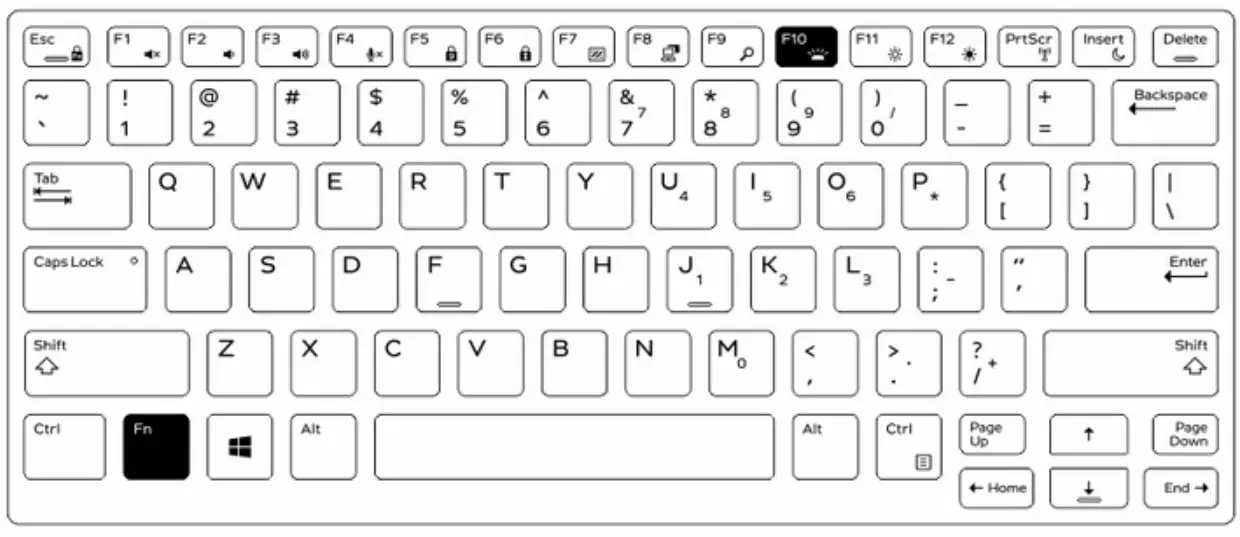
Step 2: Next, move on to the function keys and check whether the appropriate function is carried out in prompt response to your command.
Step 3: Try different combinations on your keyboard to ensure all your command functions work as well.
| Press this key | To do this |
| Ctrl + X | Cut the selected item. |
| Ctrl + C (or Ctrl + Insert) | Copy the selected item. |
| Ctrl + V (or Shift + Insert) | Paste the selected item. |
| Ctrl + Z | Undo an action. |
| Alt + Tab | Switch between open apps. |
| Alt + F4 | Close the active item, or exit the active app. |
| Ctrl + R (or F5) | Refresh the active window. |
| Ctrl + Y | Redo an action. |
| Windows logo key + D | Display and hide the desktop. |
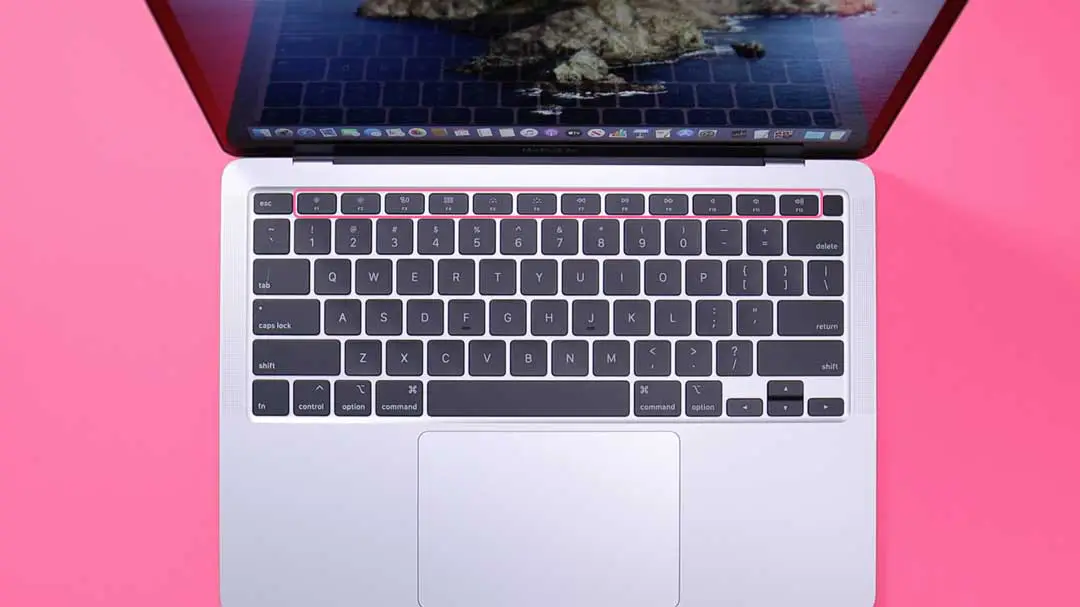
Step 4: Check if the backlight command works. The secondary function keys should be particularly checked for lighting up because that’s where you can have deep trouble while working in the dark or at night.
Although one of the easiest methods, this can feel boring and time consuming to all of you busy bees out there. Need a quicker alternative? Check the alternative methodology below for a quicker and automatic solution to keyboard testing.
Keyboard Testing Methodology 2
Step 1: Click on Start and go to the Control Panel.
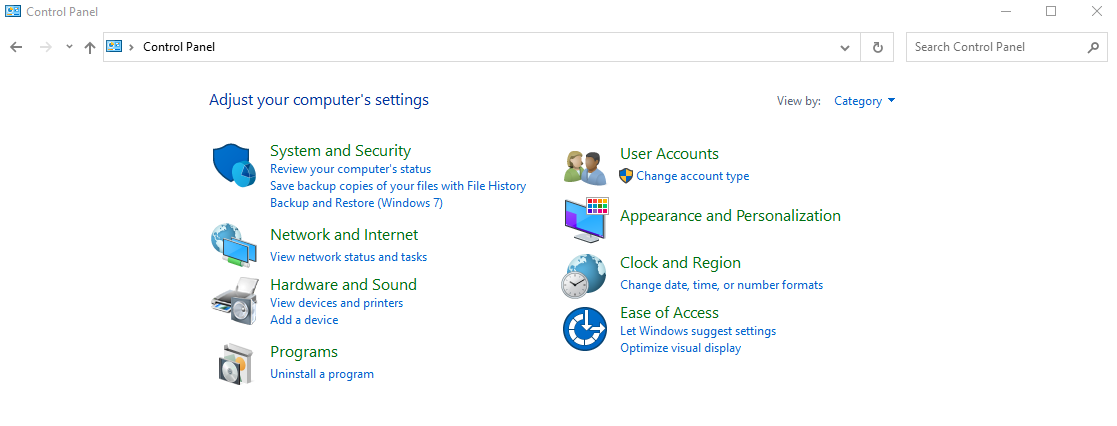
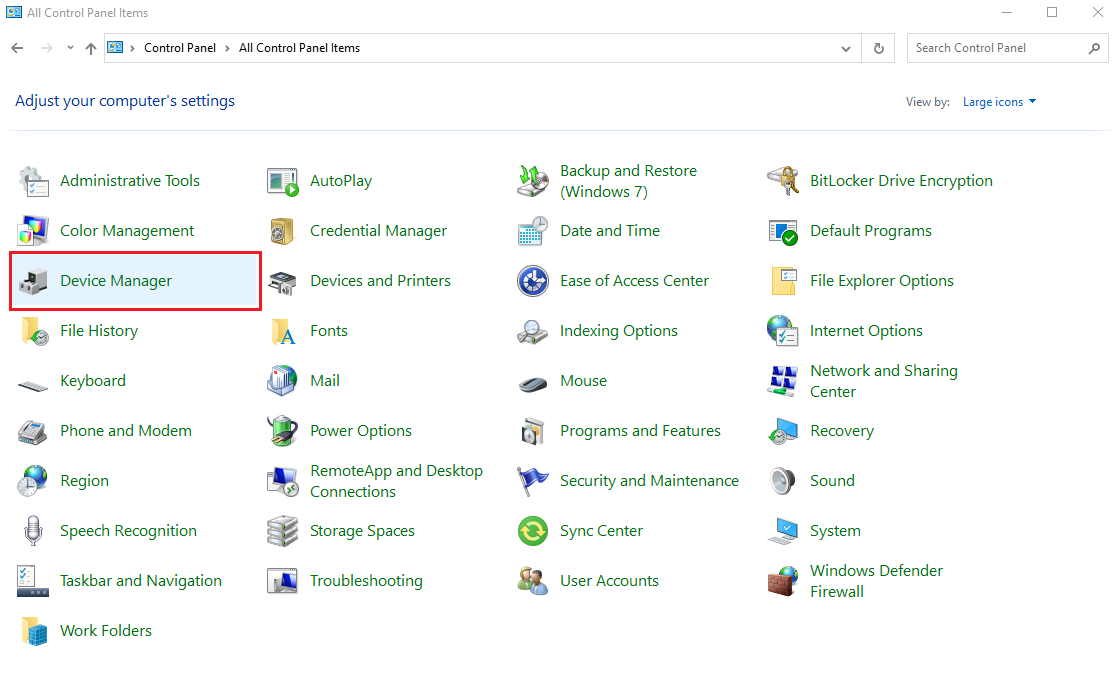
Step 2: Change the View by Category to Large Icon.
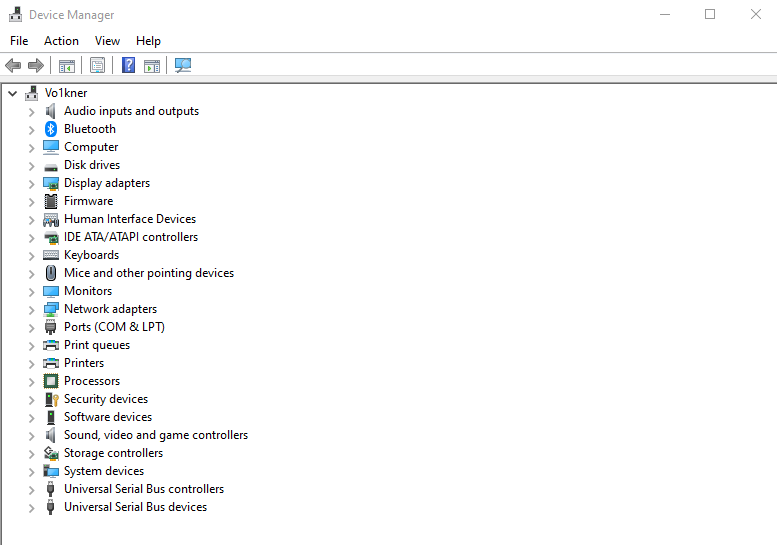
Step 3: Open the Device Manager by clicking on ‘Device Manager.’ You will find a list of all the components of the device that you can check.
Step 4: Right click on the list and you will see a menu. Select the ‘Scan for Hardware Changes’ option. This will initiate a test on your laptop’s keyboard.
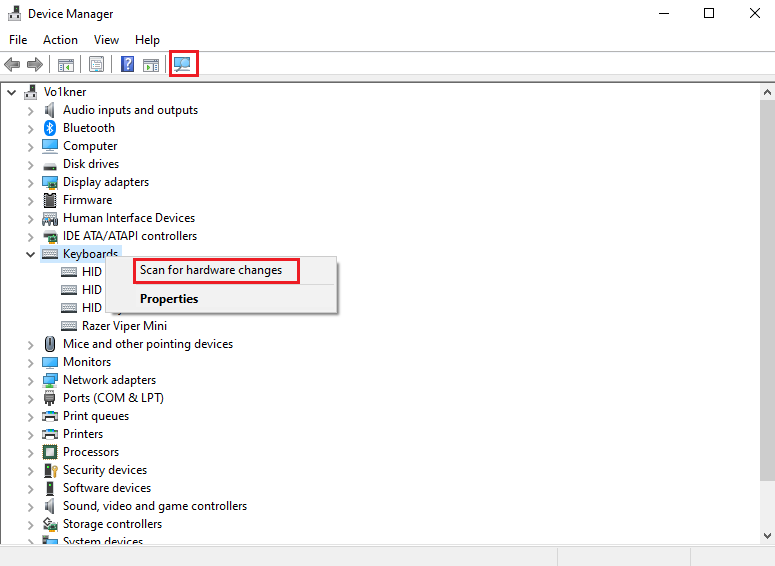
Step 5: Wait for the scan to complete and look out for the ‘error’ sign. If the scan completes without any displayed errors, your keyboard is fine and good to go.
Although a widely preferred testing methodology, remember that this only sticks through in compliance with what is fed in the computer by the manufacturer. This test leaves slight chances of mix-matching what is registered in your laptop when you press a certain key.
Trackpad Testing
A trackpad or a touchpad can make or break the user experience of a laptop. You don’t want it to be too rough and end up stressing your fingers each time you need to move the cursor or click on an icon. Neither do you want too smooth for you to have trouble keeping your motions in control.
The best part? Trackpad testing is all fun and games, quite literally.
Trackpad Testing Methodology
Step 1: Search online for a touchpad or mouse accuracy game like this one at MouseAccuracy.com.
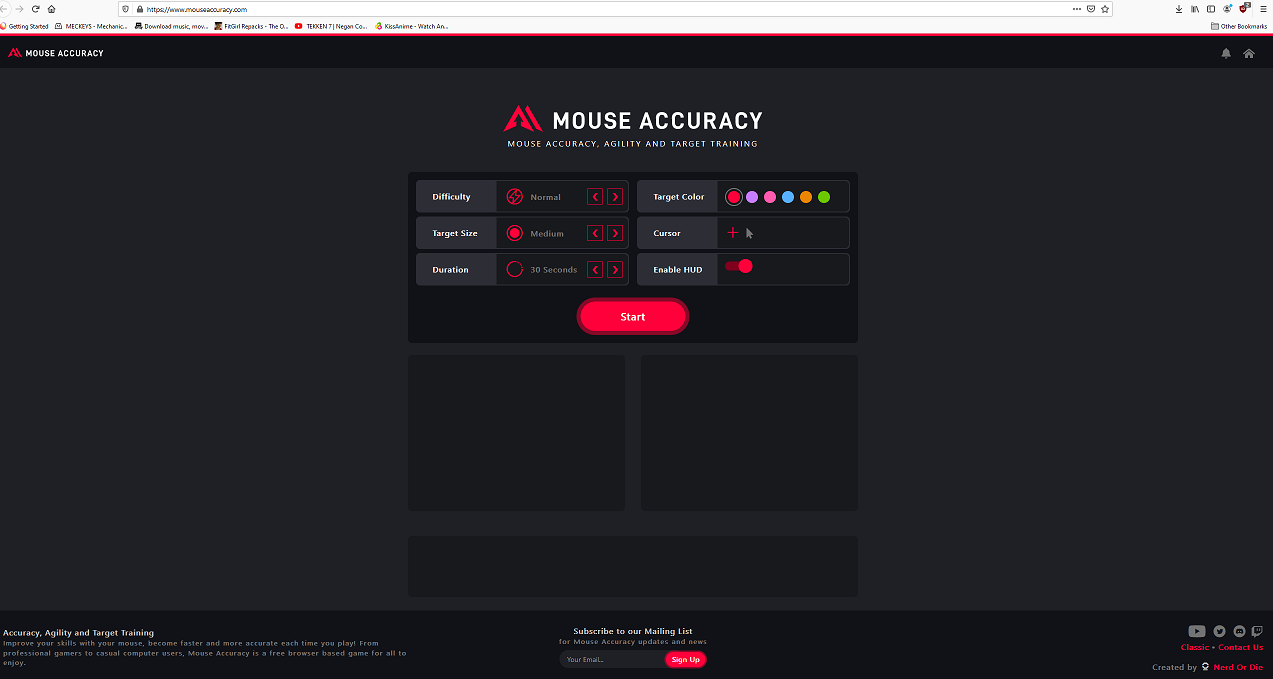
Step 2: From the range of options available, choose your pick in terms of difficulty levels, target size, speed, and above all, the cursor type.
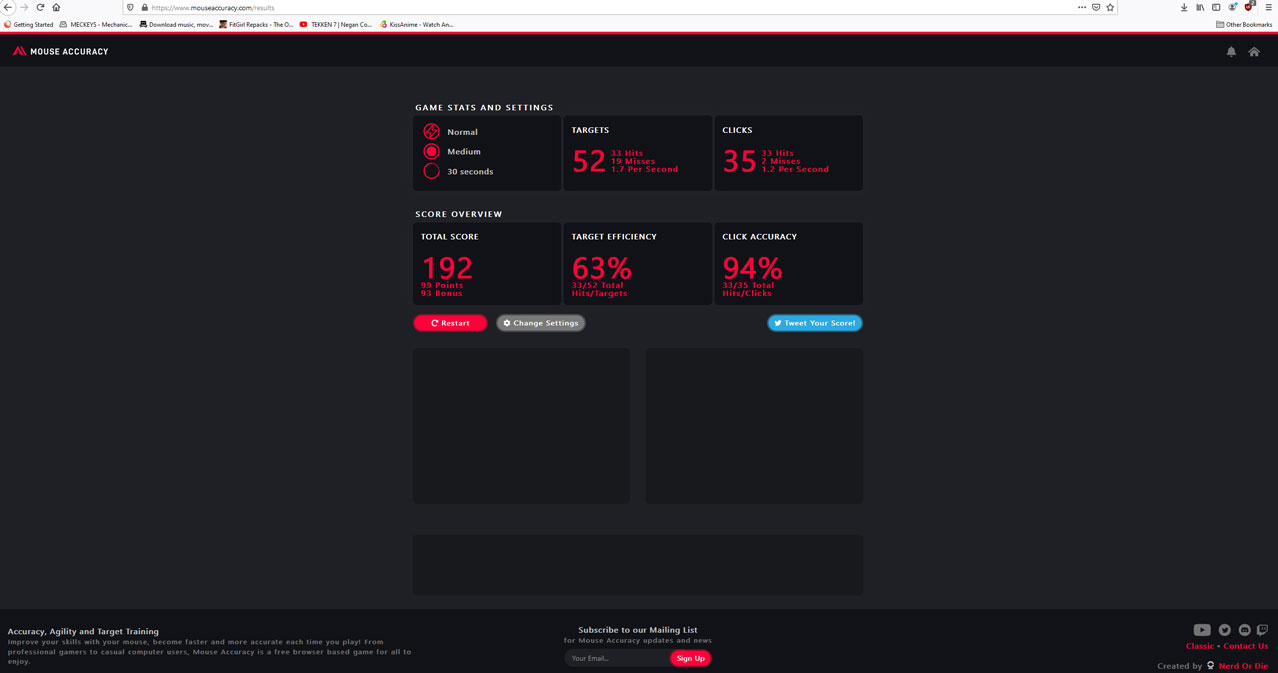
Step 3: Keep changing the speed until you find the one that is closest to your working speed with your touchpad.
Step 4: If your touchpad can keep up, it’s fine. If not, you’ll know what the problem is.
With this, we have got you covered with all the basic tests you could do with your fresh, untouched laptop. Now, let’s move on to the more exciting parts — features testing!
For the next few rounds of tests, however, you will need to update your laptop with the latest version of Windows and the latest drivers. If you have gotten yourself a dedicated graphics card, especially make sure you have the latest version of the graphics card driver.
Audio Testing
Now you would assume this simply means choosing a song you like and playing it on full volume. Some might even like to add some fun with the volume keys to ensure the audio transitions from up to down and back right up smoothly. That does pretty much comprise audio testing but there’s more to it.
Here are a few things you should keep in mind while testing:
- Many laptops have their speakers placed at the bottom. This can lead to a considerable drop in volume and quality when placed on soft surfaces like a sofa. Make sure your laptop is placed on hard surfaces that can reflect sound well.
- Insert an earphone or earpiece to check the audio connectivity with external devices.
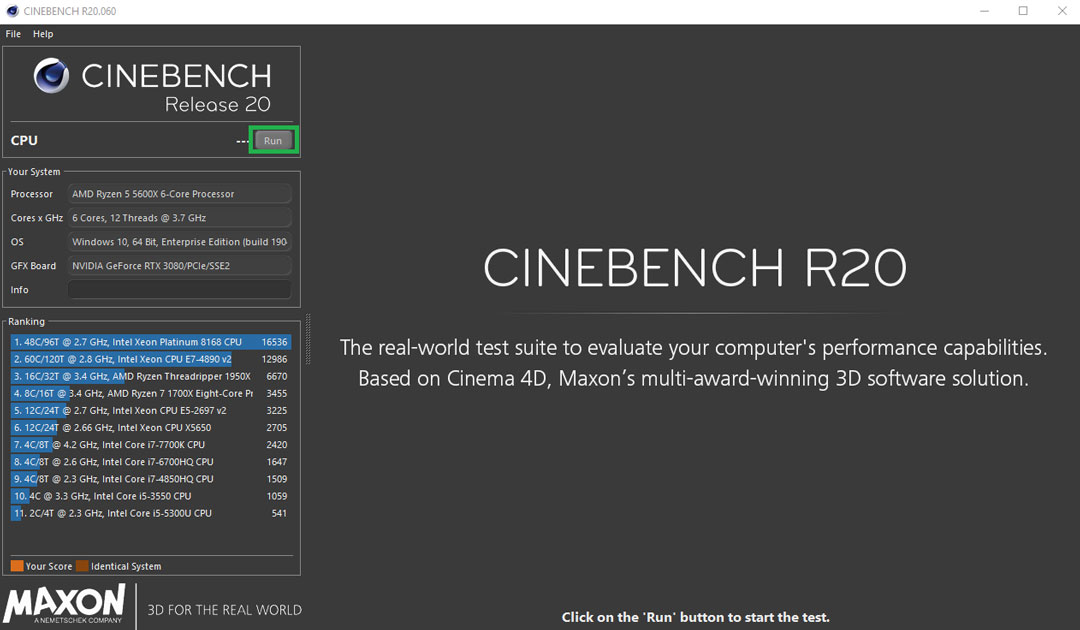
- Don’t forget to check the fan noise. In some laptops, it can get really loud and distracting. You can simply download an app like Cinebench R20 and run it while listening to the fan noise in a quiet room.
- Look out for the pitch of your fan noise. High pitches, even when quiet, can get very annoying and distracting, far more than the lower pitch fan noises.
- Hear out any sounds that might sound like a coil whine. You can do that with the same app running. Just place your ear close to the keyboard and check if you hear sounds similar to the clicking of a circuit. This can not only be high-pitched and frustrating but also a sign of unhealthy equipment.
- Finally, close all applications and open a basic one like Word or Powerpoint; preferably something that you frequently use during meetings and presentations. Now over the next couple of minutes focus on pulsating — hearing the fan turning on, or turning on and off with whirring sounds. You would want to avoid that during meetings in enclosed spaces as that can get very distracting.
CPU Testing
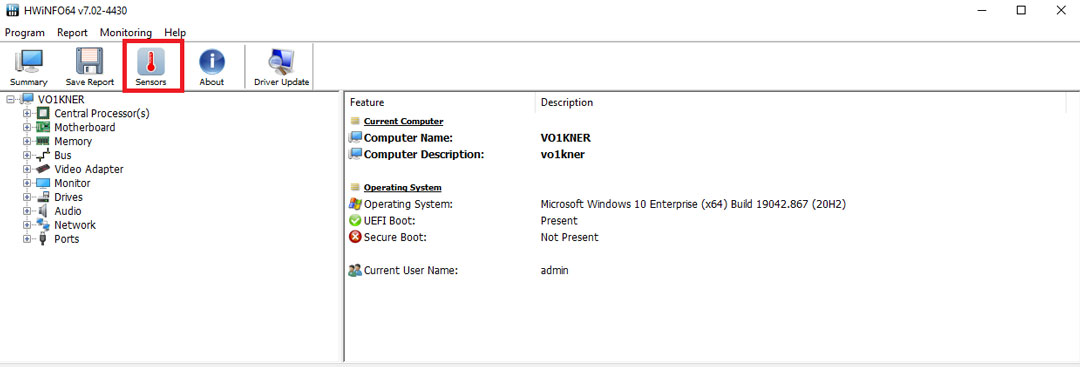
Step 1: Find an ‘information and self-diagnostics’ application online like HardwareInfo and download it.
Step 2: Navigate to the sensor area and scroll down to the option of CPU Core Temperatures. You will find different rows for each core.
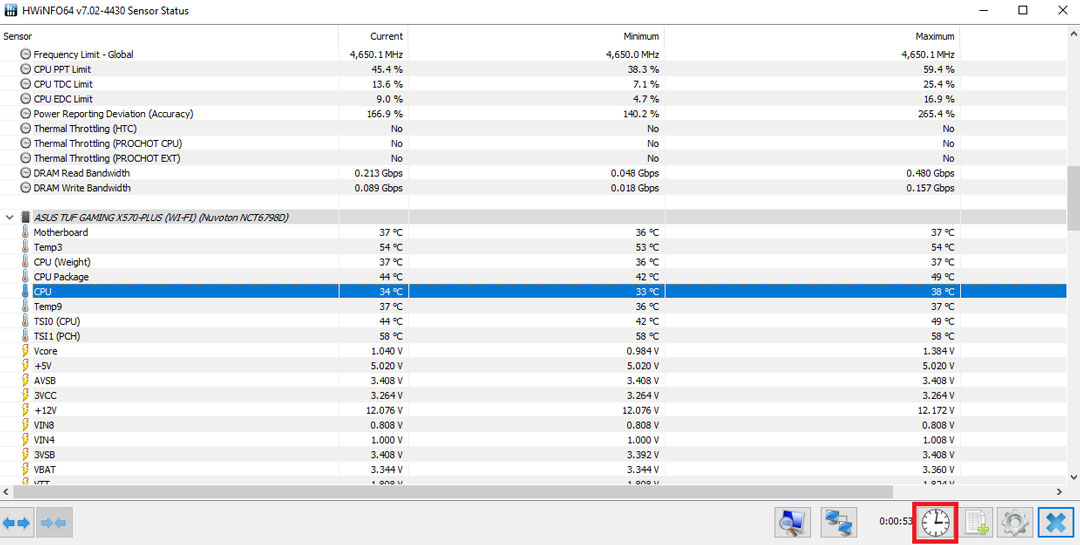
Step 3: Next, click the Reset button and then start the application you downloaded in the previous testing (Cinebench R20).
Step 4: Now check your cores again for temperatures higher than 90 degrees.
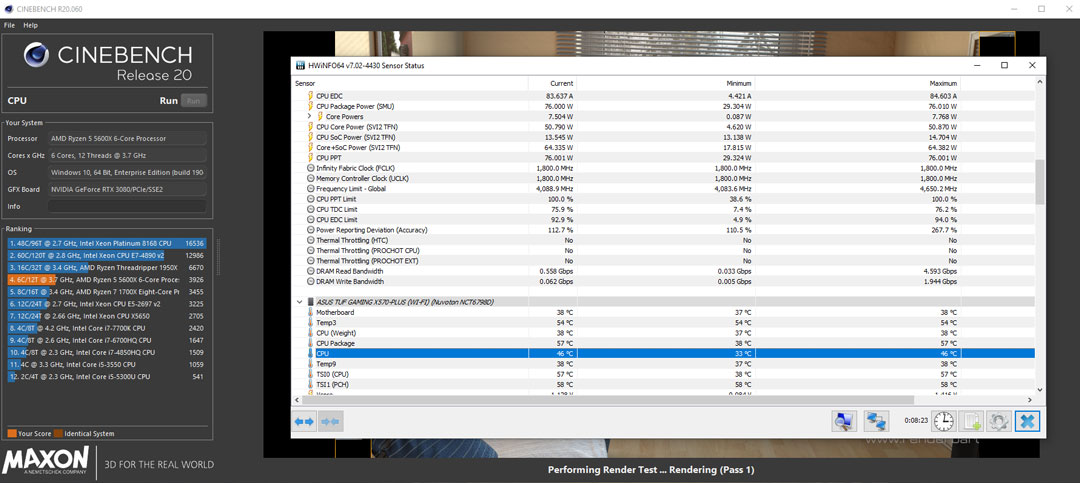
Step 5: If there is any core value higher than that, try undervolting your CPU and then re-run it. You can do that using applications like this one by Intel.
The next test is only useful for those of you who have bought a laptop with a dedicated GPU. This one’s extremely important if you’ve bought heavy-duty gaming or video editing laptop with the purpose of getting a top-notch graphic performance.
GPU Testing
Step 1: Start your favorite game or video on your laptop and check the FPS that it is giving.
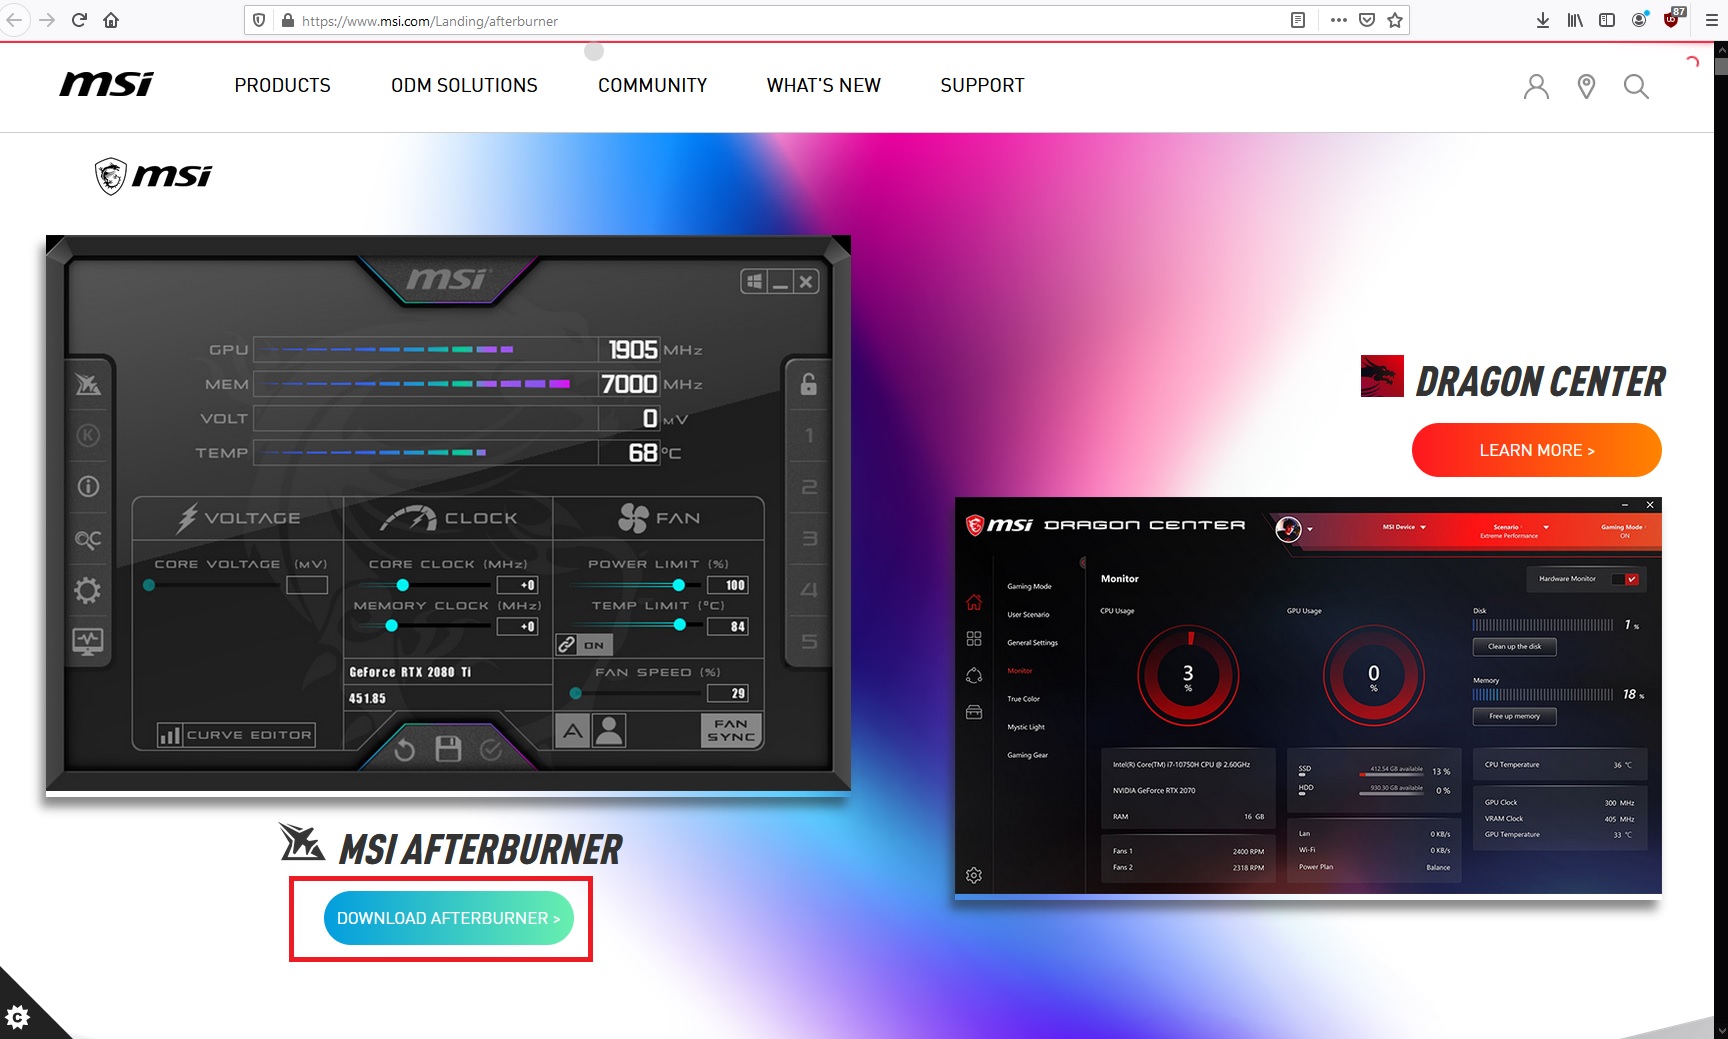
Step 2: Since different games measure this FPS in different manners, you can use a standard measuring application like the MSI Afterburner. It can accurately help you monitor your frames per second.
Step 3: Go to the website and scroll down to the Downloads section. Select the application that is compatible with your laptop.
Step 4: Once installed, run Afterburner offline and click on the Gear icon at the center of the screen.
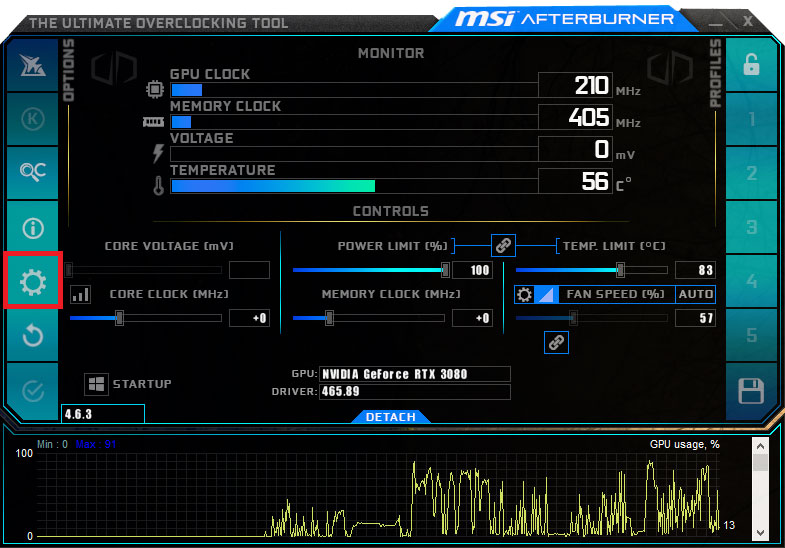
Step 5: In the Monitoring tab, scroll down until you see the standalone Framerate option. Tick the box adjacent to it to select it and then move down to tick the Scroll in On-Screen Display icon. Then click Okay.
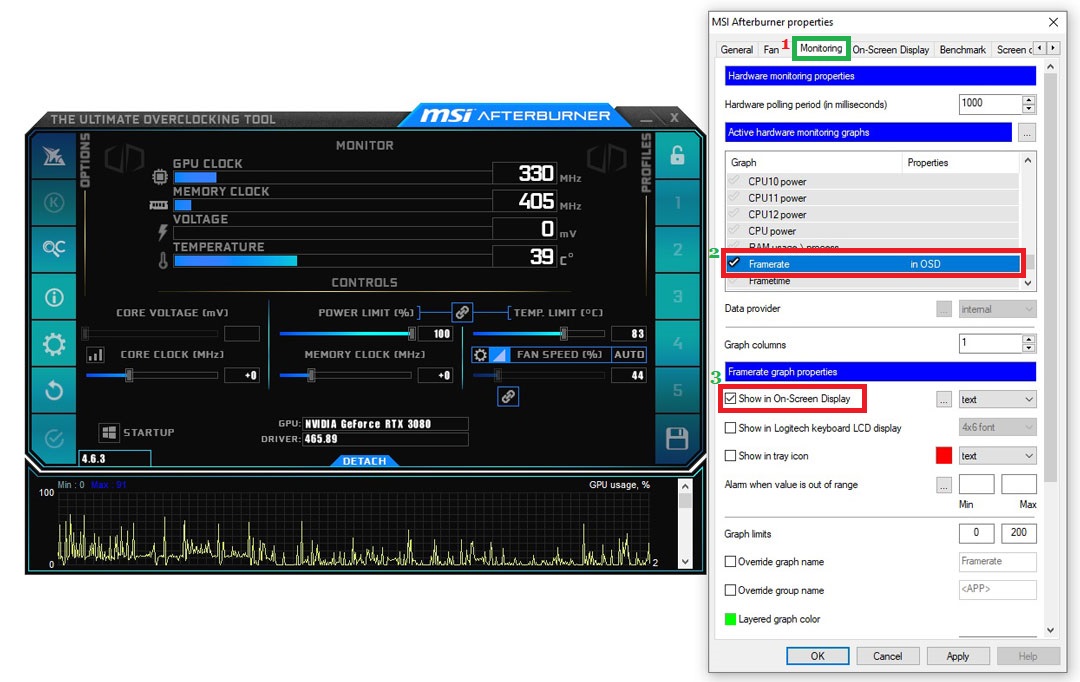
Step 6: Now check the FPS while your game is running. Make sure that it is consistently close to the range you bargained for and check for any noticeable drops (which ideally should not be there).

Now that we have covered the important parts, let me quickly walk you through the remaining tit-bits of the simple and quick tests.
Other Simple Tests
Webcam Testing: Just shoot up your webcam and check the quality. To check the audio quality, ring up a video call to a friend. Make sure your internet connectivity is good.
Battery Power Testing: Charge your laptop to 100% battery and remove the plug. Now let it sit for 30 minutes and see how much the battery drains.
Port Testing: Simply insert an appropriate external device for every port and check if it works properly.
If you do a game or perform any heavy-duty application work, you might also want to look out for any signs of overheating in your laptop. Just do your thing or keep an application running for about 3 hours and see if it is getting hotter than what is comfortable for you.
Most of these tests are easy and you don’t need a load of technical know-how to go about each one of them. Make sure you know the important values and specifications though when conducting configuration and FPS checks.
That’s about it! If your laptop passes all these tests, you are going to get every bit of value for your money. Keep testing the performance factors of your laptop every few months to ensure the health of all the components is maintained.


Very informative article. Everything is very nicely explained.
Absolutely great website for getting information about checking new pc.
Thanks a lot
I have learned many things from this article which are very
important. Thanks for telling me these things.
Very educative. Thanks